The squat, a fundamental compound exercise, is an essential part of most fitness routines due to its effectiveness in targeting a multitude of muscle groups simultaneously. It’s a fantastic exercise, but only if it’s done safely. Whether you’re a seasoned lifter or a beginner, ensuring you squat with proper form and technique is key to reaping the benefits without getting injured. Here’s a full guide to ensure you squat with confidence and prevent injuries:
Proper Form
Let’s start with the foundation – your form. Imagine your body as a building, and the proper form is the structural integrity. The better your form is, the lower your risk of injury is. Bad form will increase your risk of things like strains, chronic joint and back pain, and muscle imbalances. Here are the basic cues to perfect your squat form:
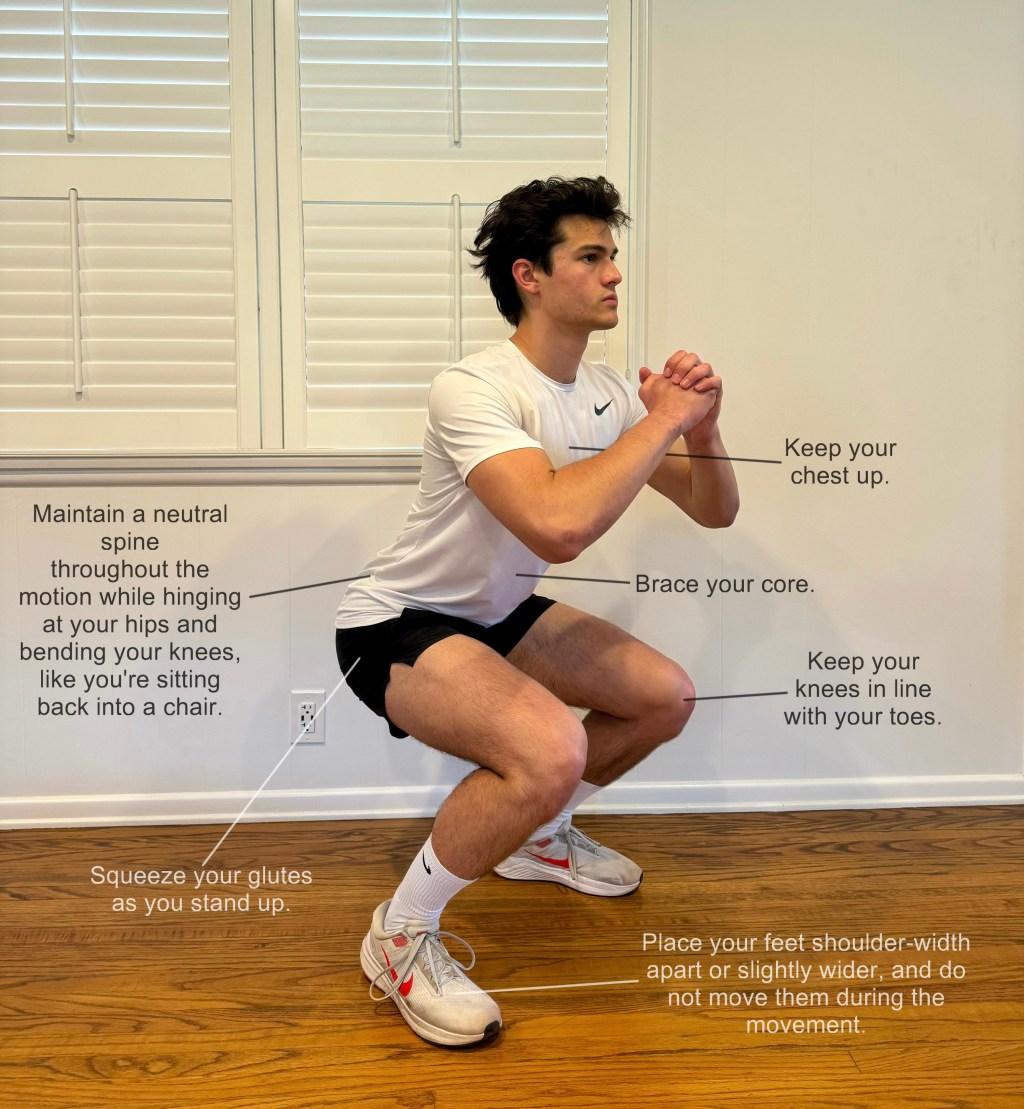
1. Feet Placement
First, place your feet shoulder-width apart or slightly wider. Allow your hips to naturally rotate your feet and the rest of your legs outward to a position that feels most comfortable for you. During the movement, don’t let any part of your foot lift off the ground.
2. Knee Position
As you squat, make sure your knees stay in line with your toes and collapse inward as little as possible to prevent knee injuries.
3. Posture
Keep your chest up and your back straight, maintaining a neutral spine throughout the squat.
5. Hip Hinge
Initiate the squat by pushing your hips back and bending your knees, as if you’re sitting back into a chair.
6. Breathing
Inhale as you lower yourself, and exhale as you push back up.
7. Controlled eccentric (descent) and concentric (ascent)
Lower yourself down at your preferred controlled speed, and push through the mid foot as you rise back up.
8. Engage Glutes
Squeeze your glutes as you ascend to the standing position.
If you’re still having trouble perfecting your form or something doesn’t feel right, seek guidance from a trainer or gym buddy.
Utilizing Your Core and/or a Belt
Bracing your core while squatting is crucial for both safety and performance. It involves engaging the muscles around your abdomen, lower back, and sides to create a stable and supportive core. This stability helps protect your spine and reduces the risk of injury, especially in the lower back.
How to brace your core:
To brace your core, take a deep breath before descending into the squat. Imagine you’re trying to expand your midsection with the breath, then tighten your core as if you’re preparing for a punch. This creates intra-abdominal pressure, providing a solid foundation for your spine and improving overall balance during the squat. Proper core bracing not only enhances squat safety but also allows you ability to lift heavier and maintain proper form.
Should you invest in a weightlifting belt?
If you find that just bracing your core isn’t enough for you and your back, consider wearing a weightlifting belt while squatting. A weightlifting belt provides external support to your core, helping you brace more effectively and easily during squats. It further stabilizes the spine and heavily reduces the risk of lower back injuries. The belt doesn’t replace proper form and technique, but complements them by providing an extra layer of support, particularly when lifting heavy. Additionally, wearing a belt can boost your confidence, allowing you to push yourself harder and potentially lift more weight while preventing injury.
Proper Warm-up
Before diving into squats, it’s crucial to prep your body. Skipping warm-ups is like launching a car in freezing weather without letting it idle. Following a good warm-up structure is crucial for preventing injuries and speeding up recovery. Here’s a warm-up structure you can use for squats and any other type of lifting exercise:
Phase 1: Cardiovascular Warm-Up (5-10 minutes):
Start by increasing your blood flow/circulation with light aerobic exercise such as jogging, jumping jacks, stationary bike, stair machine, etc. Doing this will provide increased oxygen and nutrient delivery to your muscles, and enhance endurance, joint lubrication, recovery, and even your pump.
Phase 2: Dynamic Stretching and Joint Mobilization (5-10 minutes):
Perform dynamic stretches and joint mobilization exercises that mimic the movements you’ll do during your workout. Some examples for squats include leg swings, torso twists, hip rotations, and side lunges, windshield wipers, and ankle rotations. Focus on controlled, fluid movements to enhance flexibility, range of motion, and joint lubrication.
Phase 3: Muscle Priming (10 minutes):
Do 1-3 sets of an exercise that targets the muscles you’ll be working during your lift in order to prime your nervous system and enhance muscle recruitment. For example, perform 1-3 sets of bodyweight squats or lunges, or squats or lunges with a light weight. If you want to go above and beyond, increase the weight after each set.
Following a proper warm-up structure such as this one will not only heavily decrease your risk of injury, but also increase your energy and performance during your workout session.
How Heavy?

Before you add weight to your squats, make sure you’ve mastered the form without weight and make sure you’re warmed up. After you’ve completed those tasks, it’s time to start loading.
Choosing the right weight is a balancing act. It should challenge you without compromising your form. Start with a weight that allows you to maintain proper technique. As you become more comfortable and gain strength, gradually increase the weight. This will allow you to make the progress you’re aiming for without getting injured.
Grab a spotter.
A spotter is like your gym guardian angel, especially when you’re hitting the squat rack. Watching your back (literally), their purpose is to make sure you don’t get crushed under the bar.
Having a spotter is crucial for a couple of reasons. First off, they can assist you in case you struggle to complete a rep. If you’re really struggling, they’re there to offer a little lift or support, preventing the weights from squashing you into an unsafe position. It’s not about doing the work for you, but having that safety net can make a huge difference, especially when you’re pushing your limits.
Secondly, a spotter is your extra set of eyes on your form. They can give you immediate feedback, helping you maintain proper technique and prevent any movements that might lead to injuries.
If you don’t normally work out with a buddy, don’t worry; pretty much anyone in a lifting environment will be willing to give you a spot.
When you can’t find a spotter:
When you don’t have a spotter, make sure to use safety bars. No matter how heavy you’re squatting, there’s always a chance you might reach failure earlier than you expected or something else goes wrong, and you struggle to stand back up. Enter the safety bars. Set these just below your lowest squat point. If you can’t make it back up, you can either lower into an extremely deep squat or drop the barbell behind you, and the safety bars will catch the barbell, preventing a disaster and/or injury.
Adequate Rest
Adequate rest between sets and workouts is not negotiable – it’s a necessity. Muscles need time to recover in order to prevent joint, tendon, muscle, and spine burnout and maintain peak performance during your workout sessions. Rest is the unsung hero of safety and sustained progress both during your workout and between your workouts.
During the workout:
Take 3-5 minutes of rest between sets during your workout.
Between workouts:
Give your leg muscles at least 48 hours of rest in between squat sessions.
Listen to your body.
Your body communicates with you during every squat. Listen attentively. If you experience pain beyond the usual muscle fatigue, it’s a signal to stop. Trying to tough it out will likely just make it worse and delay your recovery or, even worse, give you an injury that’ll make you miss your next squat session(s). Pushing through abnormal pain is a great shortcut to injury.
Squatting like a pro isn’t just about the gains; it’s about longevity too. Safety should always precede gains. With these tips, you can confidently embrace the squat, watching your strength soar without a wince.

Leave a comment